This guide explains some best practices, explains a few techniques and generally gives you a solid alternative to an overly image-centric email campaign.
Layout
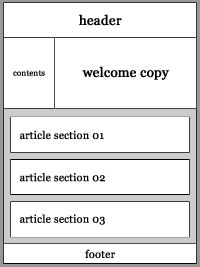
Firstly think about how you want to your content laid out: elements such as headers, footers, sidebars articles should be considered. Decide on the number of articles you plan to include and whether you want to include off-topic or announcement sections. Planning this first will make the wire-framing process easier and will give you an idea about how you're going to build the nested tables to house all your content.
Depending on your skill level or preference here you can take 2 approaches. The first would be to transfer your layout to a graphics program such as Adobe Photoshop or Fireworks and build the graphics, background images and heading placeholders over the layout.
Secondly would be to use an HTML WYSIWYG (What You See Is What You Get) editor such as Adobe Dreamweaver, Coda or even directly in the Sign-Up.to editor in the create section of your account.
750 pixels is a good maximum width for email campaigns as it fits into vertical preview panes on wide-screen monitors and also fits A4 print margins.
Content
Once you've got your layout sorted it's time to add your content (or place-holder content if you're building a template).
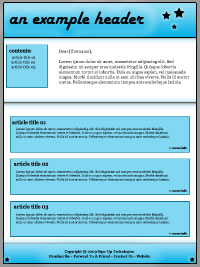
In the example we've been using I've added a header graphic image into the header, some drop shadows on the body, separated my content sections with blue tables and finished it with a footer graphic that incorporates a copyright notice and some links.
Compatibility
Once you've planned your layout, added your content and styled the campaign, there are a few things to know before sending it out.
For starters - test, test and then as they say, test some more!
Email clients are unique and each one will render elements of your email differently, or some not at all.
You can find a well-documented reference of this over at The Email Standards Project, and a few tips in our blog post. It is imperative that you test your campaign or template as thoroughly as possible BEFORE you starting sending to your subscribers. Of course not everyone can have all the different clients installed and signing up for all the different webmail accounts can be tiresome; that's why you may prefer to use a testing service such as Litmus. With Litmus you simply send your campaign test to a private unique email address associated with your account and their system runs it through all your defined email clients such as Hotmail, Gmail, Yahoo, Outlook, Outlook 2007, Thunderbird, Apple Mail – the list goes on. Screenshots are returned and you can get an idea of how well you campaign will display and where you need to tweak it if needed.
If all this sounds a little hairy then don't worry – you can give us a call and our professional design team can create you bespoke, fully-tested email templates for a great price. For those of you wanting to give it a go you can find a finished version of the template from this example in your account now (for free!). If you don't yet have a Sign-Up.to account, you can of course create a free trial account.
For generated HTML such as that from Photoshop or FireWorks, we recommend setting your output HTML to use nested tables, no spacers and non breaking spaces for those empty table cells, as this always gives the best results across the email client spectrum.