| This guide references Campaign Designer, a legacy feature which might not be available in your account. |
Our Campaign Designer template creation system allows anyone comfortable with HTML coding to create templates that can be used to design email marketing campaigns from.
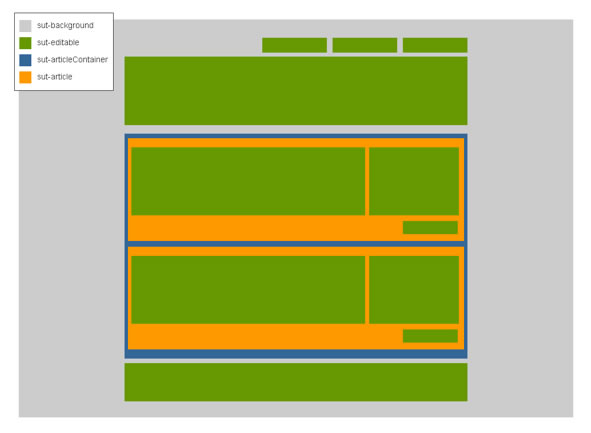
Templates should be designed as any other HTML email campaign (following the standard rules of using table-based layouts, 700px maximum width, inline CSS styles etc.) and then a few minor additions need to be made to the code to enable users to take advantage of Campaign Designer's article duplication and background setting features.
Wrap your entire template with the following code:
<table width="100%" border="0" align="center" cellpadding="0" cellspacing="0" class="sut-background">
<tr>
<td align="center">
YOUR TEMPLATE TABLE GOES HERE
</td>
</tr>
</table>
Wrapping your template with this code will center your content and tell our editor which table background colour to change when a user edits the background colour.
To put this in more technical terms, our editor looks for the class “sut-background” when the user changes the background colour and adjusts its “background-color” property accordingly.
Make your template responsive:
To make an email responsive, you need to include appropriate CSS within a <style> tag in the email's HTML <head> tags. Usually, we in-line and then remove any styles found in the <head> tag. This in-lining is important because many webmail clients (such as Hotmail and Gmail) discard <head> tags when they receive an email, removing any styling you had included.
However, many of the email clients running on mobile devices do not remove the <head> tags. As these are the devices where responsive emails would be most useful, we've created a custom attribute for the <style> tags which instructs the system to preserve them:
<style type="text/css" preserve="true">
</style>
By adding preserve="true" we will not in-line your styles and instead leave them in the <head> when we send your email. This means you can use not only media queries but also any other CSS which progressively enhances the design of your email. As you will likely have in-line styles as well as your styles in the <head> we recommend using the !important CSS rule to make sure the styles in the <head> can overwrite those styles specified in-line.
Please note that the preserved="true" attribute is unique to our system and will not be respected by all email clients – some will still remove the <head> tags and any styling within the <style> tags along with it. This means that any fonts, colours etc included in the <style> tags will be removed and the email displayed in those clients will not display your styles and formatting. Styling needs to be written in-line using style attributes in order for the email to correctly render in those clients.
Identify editable regions in your template and wrap them with the following code:
<div class="sut-editable">
YOUR EDITABLE TEXT HERE
</div>
Try to avoid including your table markup in these areas as users will be able to remove or change them and this might break their email campaign.
Choose table cells in your template which will be your article containers:
These should be single <td> tags that contain all of the “articles” in your campaign. Each of these <td> tags should be given the class “sut-articleContainer”.
<td class="sut-articleContainer">
YOUR ARTICLES HERE
</td>
Once your template is loaded in the editor, a user will be able to add new articles into each sut-articleContainer. When they click 'Add article', the first article in each sut-articleContainer will be cloned and then appended to the bottom of its container.
Identify your article tables and wrap them with the following code:
<div class="sut-article">
YOUR ARTICLE TABLE HERE
</div>
Articles should be <tables> that contain the bulk of the content of your campaign. They can include as many editable areas as you need (but they should always include at least one!).
Once your code is ready:
Upload it as a template by navigating to 'Template settings' under the Create tab in your Sign-Up.to account. Click 'Add template' and be sure to select 'Campaign Designer' as the template type.