This guide has been put together specifically for the Email Editor mode. We have separate guides for the Campaign Designer, Classic Editor and HTML input modes and for adding personalisation to templates. These can be found by clicking here.
There are three types of personalisation which this document will cover:
Personalised text
What it is
Personalised text is a way of adding specific information about your subscriber to an email campaign, for example starting an email by addressing the recipient by their first name. Personalisation creates a personal and friendly feel to your emails, encouraging subscribers to read and engage with your campaigns.
How it works
When an email is sent, any personalisation within the saved campaign is compared to your subscriber database and the relevant data is added in its place. If the data isn't present, then alternate text, which you can provide, is displayed instead. For example, if you decide to use 'customer' as your alternate text for the first name, any subscribers without a first name saved will see 'Dear customer' in their email.
A number of our standard fields can be included, but you can also include any subscriber profiles which have been previously set up within your account.
How to insert personalisation into your campaign
Adding personalisation to your email campaign is made easy using the Email Editor modes. Below are the steps you need to take in order to add personalisation.
1. Once you have opened your email in the Email Editor, click on the article within the component that you wish to insert the personalisation. The editing panel will open on the right-hand side of your screen. Within the panel, click where you would like to add the personalisation.
2. Next, click on the 'Personalisation' icon in the toolbar below.
![]()
3. Choose the personalisation you'd like to use from the drop down list.
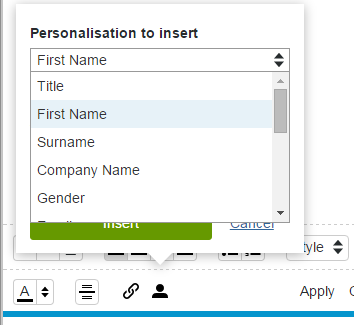
4. You can also set the alternate text that you'd like to appear should the selected personalisation not have the corresponding data in your database. You don't have to have alternate text, but if you don't, anyone without the corresponding data will see a blank space.
Note: if you have already written your alternate text within your content, you can highlight this before clicking the 'Personalisation' icon, this will then automatically be set as the alternate text.
5. Next, click 'Insert' and you will see the personalisation has been added.
It will appear in the editor as the following, using the example of first name personalisation:
{sut-first_name:customer}
The word after the colon is the alternate text, in this example 'customer'. You can edit this at any point, but the text before the colon needs to remain the same. You can also remove it, but the colon should not be removed.
Personalised links
What they are
Personalisation can be inserted into your link URL allowing for the creation of personalised links. This is useful if you want to pass information from your subscriber data to your site.
How they work
As with personalised text, when an email is sent, any personalisation within the saved campaign is compared to your subscriber database and the relevant data is added in its place. In the case of subscriber data being unavailable, nothing will be inserted into the link.
How to insert personalised links into your campaign
Adding personalisation to links within your email campaign is made easy using our Email Editor. Below are the steps you need to take in order to add link personalisation.
1. Once you have opened your email in the Email Editor, click on the article within the component that you wish to insert the personalised link into. The editing panel will open on the right-hand side of your screen. Within the panel, highlight the word or click on the image that you would like the link to sit behind.
2. If you are inserting the link behind text you will then need to click on the 'Link' icon in the toolbar below.
3. Enter the URL in the address field followed by the dollar sign '$' to bring up the drop down menus for personalisation.
4. Choose the personalisation from the drop down list. Repeat this process for all of the relevant personalisation that you would like to add to the link.
You will see a personalised token added to the end of your URL, for example if you inserted first name personalisation it would appear as follows:
$sut_first_name$
5. A unique name for the personalised link will be automatically generated for you when you save your campaign, so that your link can be successfully tracked in the Analyse section of your account.
6. Now click 'Insert' and the personalised link will be inserted.
Campaign links
What they are
In addition to the above personalisation fields, campaign links can also be inserted into the email campaign. These links allow your subscribers to perform special actions such as sending your email to their friends or viewing your email in their browser.
How they work
Just as with regular links, campaign links are simply links to actions within the Sign-Up.to system. When a user clicks a campaign link the appropriate action is taken, for example if a subscriber clicks to unsubscribe, their email address is removed from your database.
Personalisation that can be included

How to insert campaign links into your campaign
Adding campaign links within your email is made easy using the Email Editor. Below are the steps you need to take in order to add link personalisation.
1. Once you have opened your email in the Email Editor, click on the article within the component that you wish to insert the campaign link into. The editing panel will open on the right-hand side of your screen. Within the panel, highlight the text that you would like to make into a campaign link.
2. Click the 'Link' icon in the toolbar below.
3. Select the 'Campaign link' type.
4. Choose a campaign link from the drop down list.
5. Now click 'Insert link' and the campaign link will be inserted.