If you want to further target your marketing, it's good to know as much about your subscribers as possible so you know what they want to hear about. Using subscriber profile fields, you can store everything from their names and locations to their favourite brand of cat food. Sending your subscribers a campaign linking to a data capture form to fill out additional information, is a good way to ensure you are engaging with them as fully as possible.
If you already know some things about your subscribers, what you don't want is to make them repeat themselves. Ideally if you send them a form, you want everything you already know about them pre-filled in for them. Using a personalised link you can do just this - here's how.
Step 1: Create your form
Go to the "Forms" page under the Collect tab. Click to create a new form, attach it to a list, then get customising. You can include any custom data fields you need and also add a "thank you" page. Since this form will be used for subscribers who are already in your account, you won't necessarily need them to complete the double opt-in loop again, so go to "Options" and check the box to skip this step.
Step 2: Get the link
Back on the "Forms" page under Collect, you can click on the icon for the form and hit the "Promote" button. On the next page, you'll want "Link to this form" to show the form's hyperlink that you'll need for your campaign.
Step 3: Personalise the link
Hop into your campaign and highlight the text which you want to hide the link behind. Now go to "Insert/edit link", and paste in your form URL. Here's where you want to add the personalisation code so that it adjusts the link for each subscriber to pre-populate the form. It's really easy to do - you'll need to type a question mark after the URL to start the first personalisation, then use the column header for the first profile field on your form followed by an equals sign, and if you type a dollar sign after that, a dropdown will appear so you can choose which personalisation you want to put in there. To add more personalised fields continue the string with an ampersand and add the next profile field and so on. An example link might look like this:
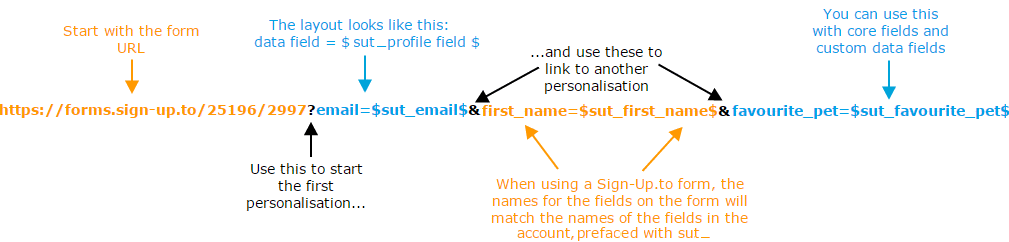
Please note - personalised links should not be shortened using a link shortener, as they won't work.
Step 4: Test it!
Personalisation such as this won't work in a preview, so you'll need to send a live test. Create a test list in your account and add a few of your own email addresses - your work address, your personal address. Make sure each address has some profile field data filled in so you can test the form link. Now schedule your campaign to send to that list, and when it arrives, click the link, and check that the information you added has pulled through into the form.
Feeling technical? If you create your own templates to make email campaigns from, you can use this same kind of personalisation - just replace the $ signs with % signs.