This guide has been put together specifically for the HTML input mode. We have separate guides for the Email Editor, Campaign Designer and Classic Editor modes and for creating templates. You can find these by clicking here.
There are four types of personalisation which this guide will cover:
Personalised text
What it is
Personalised text is a way of adding specific information about your subscriber to an email campaign, for example starting an email by addressing the recipient by their first name. Personalisation creates a personal and friendly feel to your emails, encouraging subscribers to read and engage with your campaigns.
How it works
When an email is sent any personalisation within the saved campaign is compared to your subscriber database and the relevant data is added in its place. If the data doesn't exist then alternate text, which you can provide, is displayed instead. For example, if you decide to use 'Customer' as your alternate text for the first name, any subscribers without a first name saved will see 'Dear Customer' in their email.
Personalisation that can be included
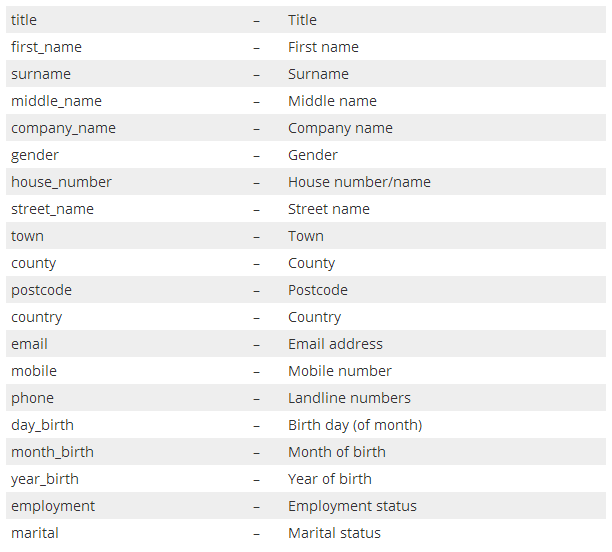
Please note: if you have created any Subscriber Profile fields, these can also be inserted using the 'import_header' for the value tag.
How to insert personalisation into your HTML code
Personalisation is added using a custom HTML tag, an example of which follows:
<signup_name value="first_name" alt="customer">
The text inside the 'value' element defines what personal details to include. The text inside the 'alt' element is the text that will appear if those details are not available for that subscriber. For example, the tag above would insert the person's first name into the message. If this is not available then the text 'customer' would be inserted instead (without the quote marks). A style attribute can also be included in this tag to format the text.
You don't have to have alternate text, but if you don't have it, anyone without the corresponding information will see a blank space. If you choose not to use alternate text, you'll still need the alt="" code, so just remove the part between the quotation marks.
Please note: the code always has to appear as '<signup_name' at the beginning no matter what personalisation is being added.
If you're using a 'date' field, you can also choose how you want the date to be formatted in your email, whether you want the full date and time (e.g. Tuesday, 29 April 2014, 17:10) or just a quick slashed date (e.g. 29/04/2014). In order to set the format, after adding the import header as the 'value', add a hash # symbol, then select one of the following letter codes:
| l | Long date | Tuesday, 29 April 2014 |
| lt | Long date with time | Tuesday, 29 April 2014, 17:10 |
| m | Medium date | Tues, 29 Apr 2014 |
| mt | Medium date with time | Tues, 29 Apr 2014, 17:10 |
| s | Short date | 29 Apr 2014 |
| st | Short date with time | 29 Apr 2014, 17:10 |
| dr | Dashed date reversed | 2014-04-29 |
| drt | Dashed date reversed with time | 2014-04-29 17:55 |
| slf | Slashed date forward | 29/04/2014 |
| slft | Slashed date forward with time | 29/04/2014 17:10 |
| slfus | Slashed date forward US | 04/29/2014 |
| slust | Slashed date forward US with time | 04/29/2014 17:10 |
Your final personalisation code will look a bit like this:
<signup_name value="date_field#s" alt="this date">
This will appear in your campaign as either "29 Apr 2014" or "this date".
Having problems with syntax errors?
If you're having problems with the signup_name tag throwing up syntax errors, it could be because dynamic content is switched on in your account. Instead, you can use the profile tag as described in our tutorial on dynamic content. Alternatively, contact our friendly Support team who will be able to help you further.
Personalised links
What they are
Personalisation can be inserted into your link URL allowing for the creation of personalised links. This is useful if you want to pass information from your subscriber data to your site.
How they work
As with personalised text, when an email is sent, any personalisation within the saved campaign is compared to your subscriber database and the relevant data is added in its place. In the case of subscriber data being unavailable, nothing will be inserted into the link.
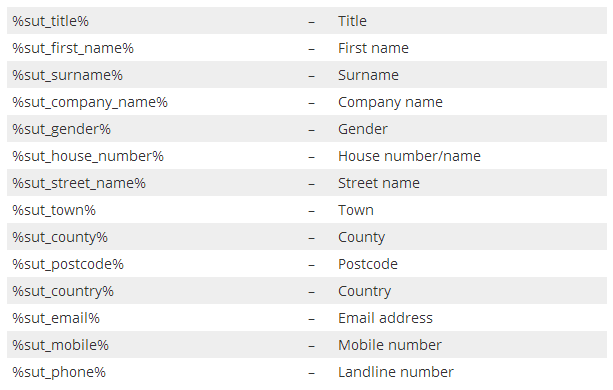
Personalisation that can be included
How to insert personalised links into your HTML code
To insert link personalisation into your code you will need to use the custom signup_link tag, as follows.
<signup_link value=" " name=" "> Text </signup_link>
In this example, we will add first name personalisation to the following URL which will perform a Google search of the subscriber's first name:
http://www.google.co.uk/search?q=
In your URL you will need to add the correct personalisation value, as detailed in the table above. For this example we will add the first name to the link, displayed as %sut_first_name%.
http://www.google.co.uk/search?q=%sut_first_name%
Next, we insert this URL into the value attribute of our custom signup_link tag:
<signup_link value="http://www.google.co.uk/search?q=%sut_first_name%" name="search_first_name"> Text </signup_link>
If you were to send the above link to a subscriber called John, the following link would be generated:
http://www.google.co.uk/search?q=John
The 'name' attribute is optional. If the 'name' attribute is specified, the above link will be tracked by Sign-Up.to's link tracking system. However, if omitted from the tag, the link will not be tracked. If more than one personalised link is in the campaign and they need to be tracked, the 'name' element should be unique as these will be displayed in the Analyse section for this campaign. Any links carrying the same value in the 'name' attribute will be tracked as one item.
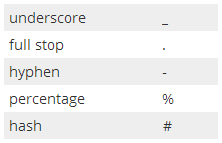
Please note: only alphanumeric characters (a-z, A-Z, 0-9) and certain punctuation characters (listed below) can be used for the tracking name. Other characters will be removed when sending.
Campaign Links
What they are
In addition to the above personalisation fields, campaign links can also be inserted into the email campaign. These links allow your subscribers to perform special actions such as sending your email to their friends or viewing your email in their browser.
How they work
Campaign links are links to actions within the Sign-Up.to system. When a user clicks a campaign link the appropriate action is taken, for example if a subscriber clicks to unsubscribe, their email address is removed from your database.
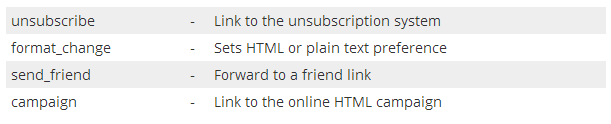
Personalisation that can be included
How to insert campaign links into your HTML code
The above personalisation values can be inserted as the value attribute in the custom signup_name tag as follows:
<signup_name value="unsubscribe" alt="click here to unsubscribe">
In this instance, the 'alt' element is used to specify the text to be displayed as the link.
Having problems with syntax errors?
If you're having problems with the signup_name tag throwing up syntax errors, it could be because dynamic content is switched on in your account. Instead, you can use action tags as described in our tutorial on dynamic content. Alternatively, contact our friendly Support team who will be able to help you further.
Wrapping campaign links around an image
To make an image into a campaign link, the HTML code is slightly different as the signup_link tag needs to be used.
Personalisation that can be used

How to insert an image as a campaign link into your HTML code
The above personalisation values can be inserted as the value attribute in the custom signup_link tag as follows:
<signup_link value="%sut_unsubscribe%"> <img src="insert image URL here" /> </signup_link>
What it is
In order to ensure that only valid and correctly typed subscriber data is added to your account, our data capture forms use a double opt-in loop so that subscribers can confirm their subscription. After a subscriber submits their details via a form, they'll receive an email with a unique link which they need to click to validate their subscription. This opt-in email can be customised to include your choice of text and company branding.
How it works
Create the email campaign using HTML, insert the tag used for the opt-in link (see below) and save it as a 'custom opt-in email', see diagram below.
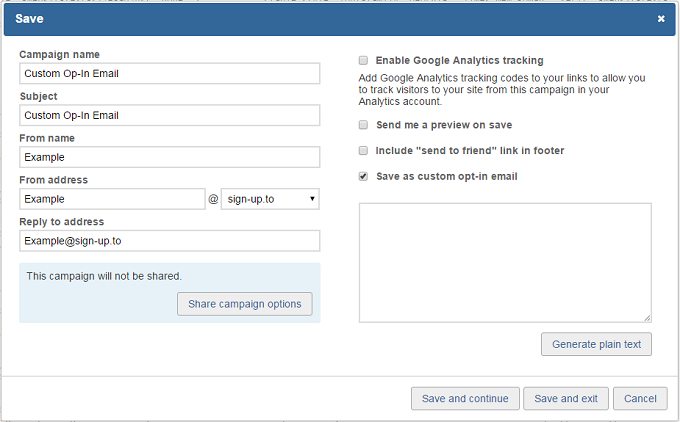
Please note: the option to 'save' the email campaign as an 'opt-in email' will only appear if the specific personalised link has been inserted, see below.
As soon as the campaign is saved as a 'custom opt-in email' you will be able to add this to the relevant list within your Lists page held under the Collect tab.
Please see our 'Create a Custom Opt-In Email' guide, for more information on how to add the email campaign to the lists.
How to insert the Custom Opt-In link
Add the following tag into your HTML code, at the point you wish the link to be inserted within your email campaign.
<signup_link value="%sut_optin%" name="opt-in">click here to activate your subscription</signup_link>
The above tag is only an example and you're able to update the 'click here to activate your subscription' text with the text you wish to use for the link.